This is an in-depth review of the InLinks internal linking tool. In this post, I’ll cover how the tool works, its features, pricing, and benefits.
Let’s dive right in.
The InLinks approach to internal linking
InLinks looks at internal linking from the viewpoint of entities. As the leading entity-based semantic SEO tool, it uses its Natural Language Processing (NLP) Algorithm to analyze content and understand the entities within. Then, it builds a world-class knowledge graph of these entities and uses them to create an organized information network within your website.
This approach to internal linking gives your content and website context and makes it easy for the web crawler to discover, understand and index your content for SEO. It also helps visitors enjoy a seamless user experience while navigating your website.
With that understanding out of the way, let’s look at the features of the internal linking tool.
Features of the InLinks Internal linking tool
1. Entity-based anchor-text selection
The anchor text is the clickable part of a hyperlink, and when it comes to internal linking, selecting the right anchor text is InLinks’ bread and butter feature.
Since the tool is entity-based, the system detects anchor text opportunities by understanding the underlying meaning of the concepts within your pages. This way, it is able to find keywords, phrases, and sentence fragments that convey this meaning and use them as anchor text for internal linking.
The benefit of this approach is two-pronged and sets InLinks apart from other internal linking tools.
First, the internal links it builds seem more natural. One common and valid SEO practice is to optimize internal links with your target keyword. So, most other internal linking tools use exact-match keywords for link anchors.
While acceptable, it can easily lead to keyword stuffing and make your internal links look spammy. Interestingly, InLinks solves this problem by varying link anchors with keyword variations, synonyms, and sometimes exact match words that contain the underlying meaning of a page to which an internal link points.
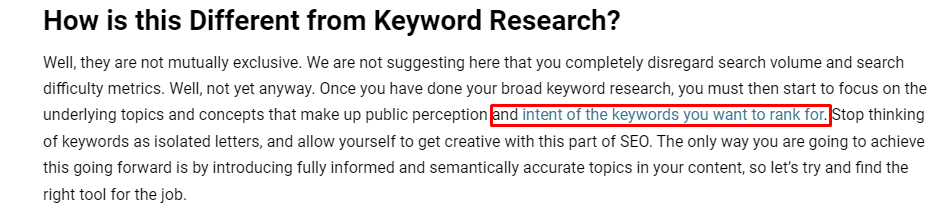
For example, in one article on building topical authority, InLinks detects a linking opportunity between that page and another page on user intent in search. The software then uses the sentence fragment “intent of the keywords you want to rank for” as the link anchor between the pages.
This anchor text fits seamlessly into the surrounding text. It creates a good reading experience for users while giving search crawlers all the context they need to understand the linked pages.
Related → Best Practices for building internal links
Secondly, the InLinks entity approach prevents content cannibalization. Since the tool directs you to associate your core topics with the best content pages you have, it forces you to intentionally target separate topics for different pages. So, there’s little chance of your content pages cannibalizing themselves.
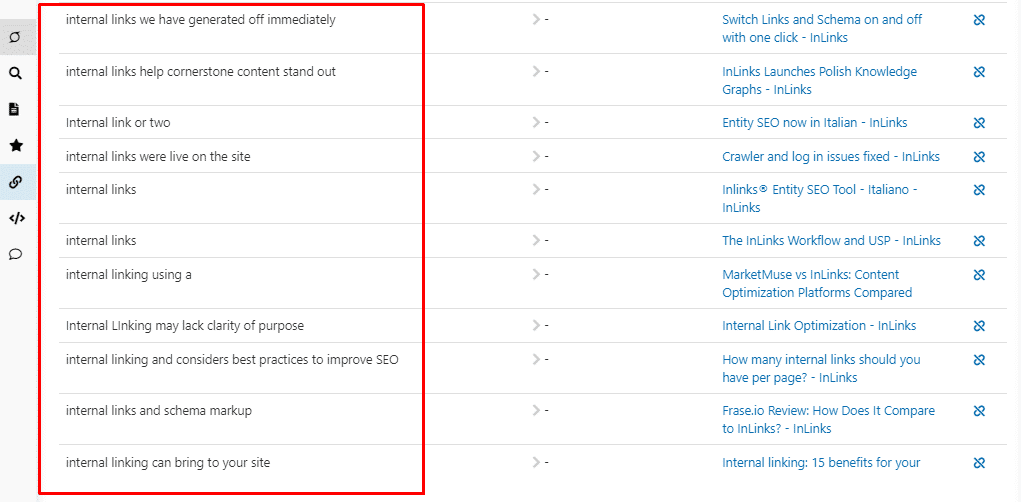
Here are some anchor texts InLinks has selected for building links to a cornerstone page on Internal Links from other relevant source pages.
2. Automatic internal linking and optimization
Once you set up your website pages on InLinks (which I’ll show you how to do in a bit), the system automatically builds internal links between your pages. But it doesn’t stop there.
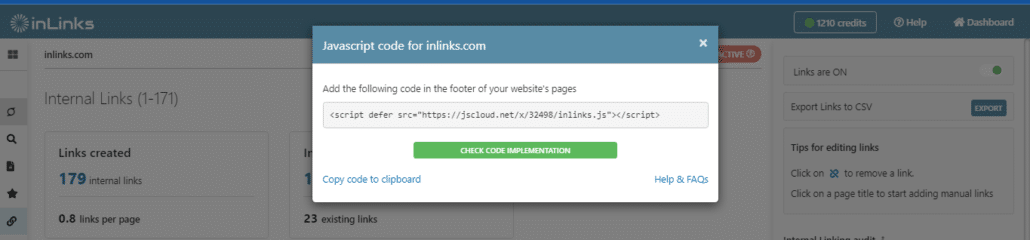
InLinks can inject those links live onto your website and continue optimizing them once you add the Javascript code the system provides into your website’s footer and validate it.
Here’s what the code looks like.
This feature serves two purposes.
- It keeps your internal links structure optimized
- It saves you time
One reason why SEOs overlook internal linking is because of the sheer scale of the task. As your website grows, tracking and updating internal links manually becomes difficult. But this line of JS code keeps InLinks running in your site’s background. So, every time you add a new page or update old content, InLinks will find internal linking opportunities, build the links and inject them into your site.
3. Internal links score
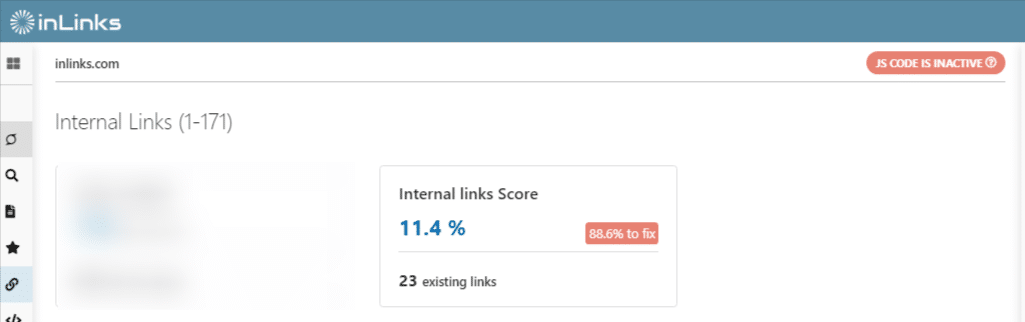
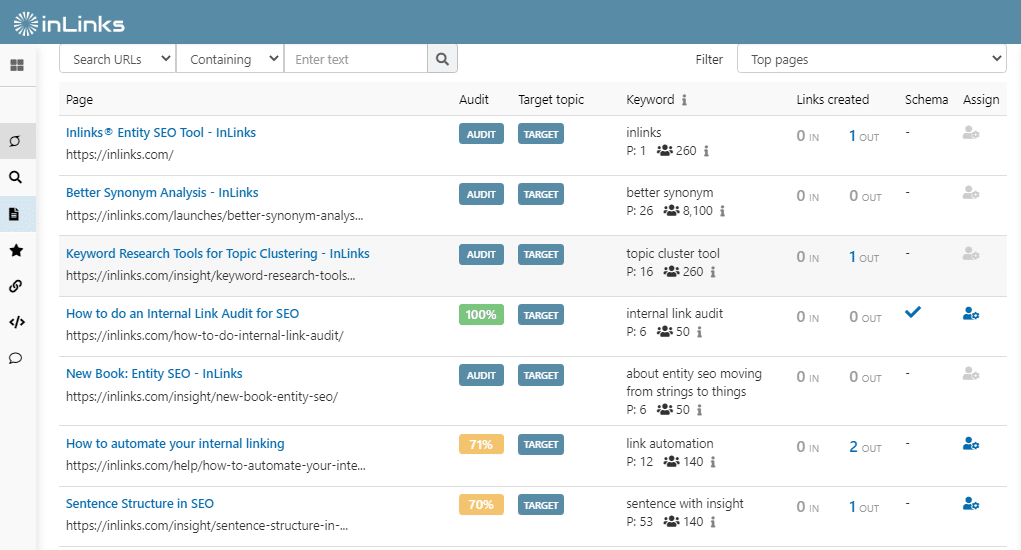
This feature is a proprietary metric from InLinks, and it shows the percentage of missed internal linking opportunities on your website. Based on the number of pages you’ve added to an inlinks project and associated a target topic to, the internal linking score will show how well content topics are connected within your site.
This score considers the hardcoded links already existing on your pages and then looks for internal linking opportunities you can explore to further optimize for SEO. Once you add internal links with the JS code, the score changes. The higher the internal links score, the better optimized your website is.
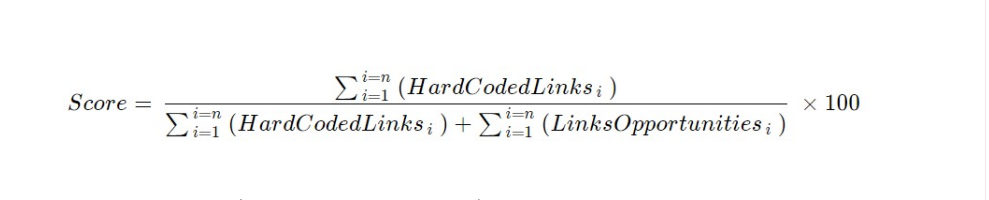
Here’s how InLinks calculates internal linking score.
4. Internal links audit
This feature shows you how well you’re building internal links to your pillar page for each topic and optimizing them for search engines. Based on InLinks’ understanding of the entities within your site, the InLinks software compares the hard-coded links on your pages with the link opportunities identified and added by the InLinks JS code.
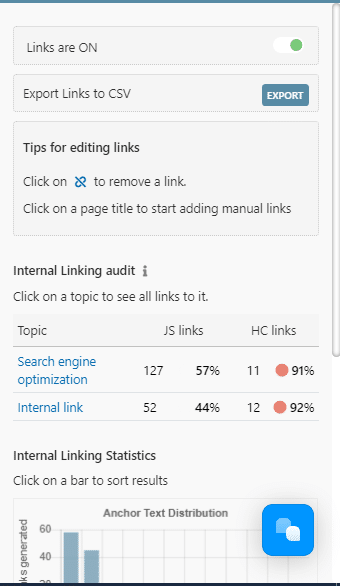
The purpose is to show you
- how well your links relate to the entities associated with your content
- entity-based link duplication and
- opportunities for diversifying your internal links.
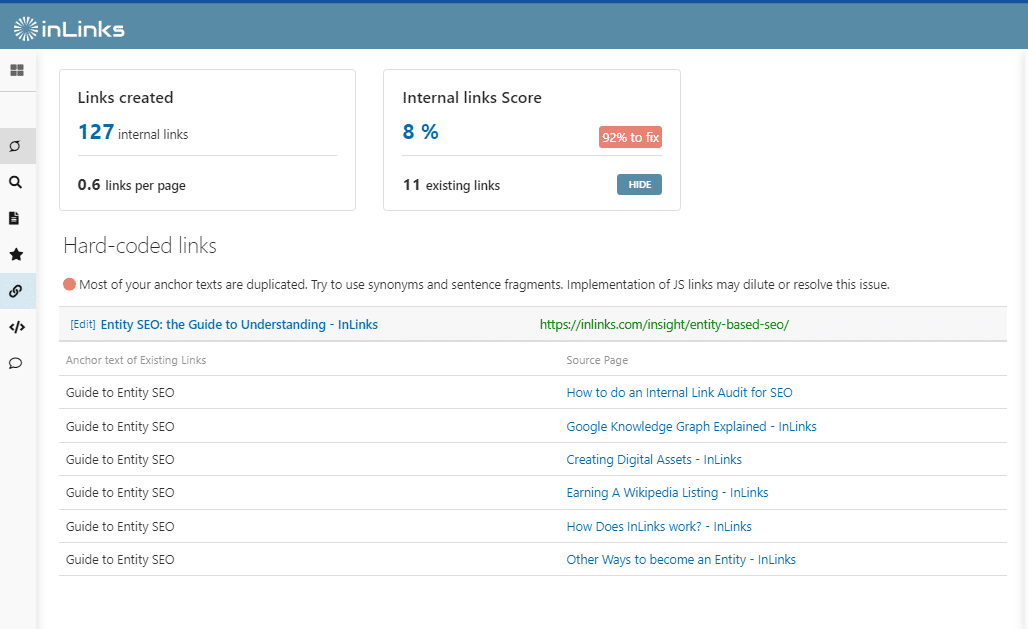
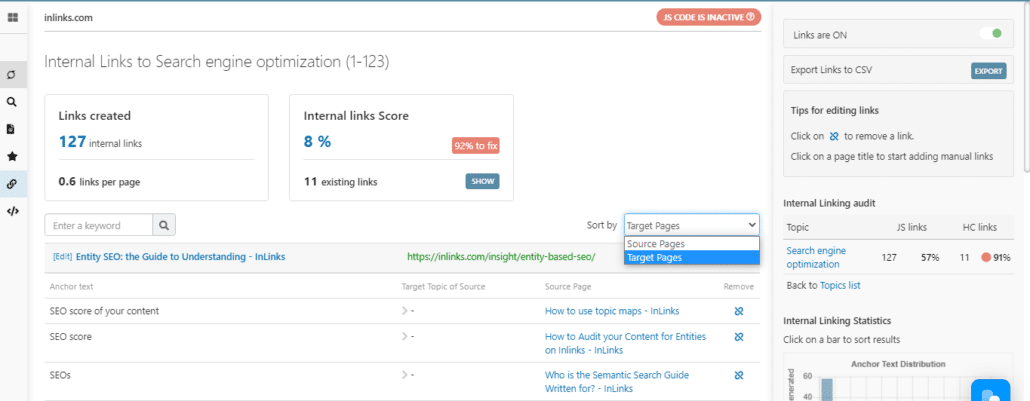
Take the image above for an example. It’s an internal links audit report for InLinks.com. From the pages added to a project, I have associated the topic of search engine optimization and internal links to their target pages. InLinks has, in turn, identified 127 JS links for the topic of SEO, with 57% varied anchor texts. On the flip side, I already have 11 hard-coded links for the topic of SEO, with 91% of them being duplicate links (the red dot indicates duplicate links).
From here, I can click on the hard-coded links to view their anchor text and manually diversify them with synonyms or sentence fragments. Conversely, when you implement the JS code, the InLinks software will try to dilute these duplicated links.
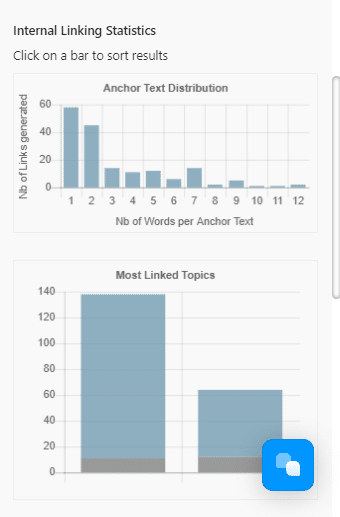
Still on the audit screen, InLinks show internal linking statistics like anchor text distribution and most linked topics. With this data, you can evaluate the quality of your internal linking structure and better optimize your site for ranking.
Now that you understand the features of the InLinks internal linking tool, here’s a breakdown of how the tool works.
How to build internal links with InLinks
First, you need to create an account to use the InLinks internal linking tool. So, if you’re not signed up already, create a free account here, then log in.
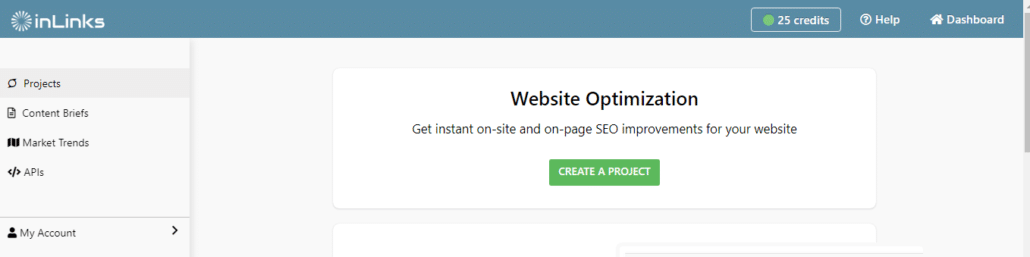
STEP 1: Create your first project
Once you sign up, you’ll get 20 free credits. So, click the green Create a Project button to create your first project.
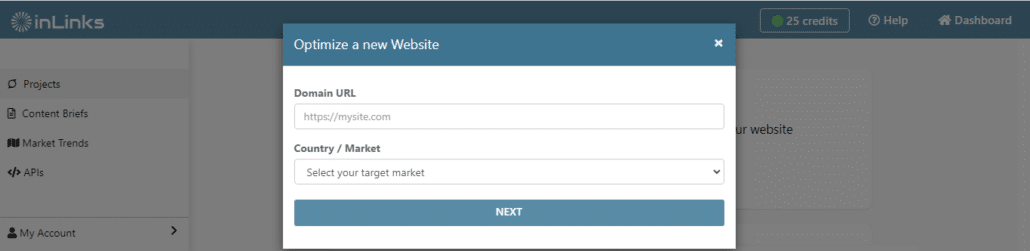
Next, add your website URL and select your target market.
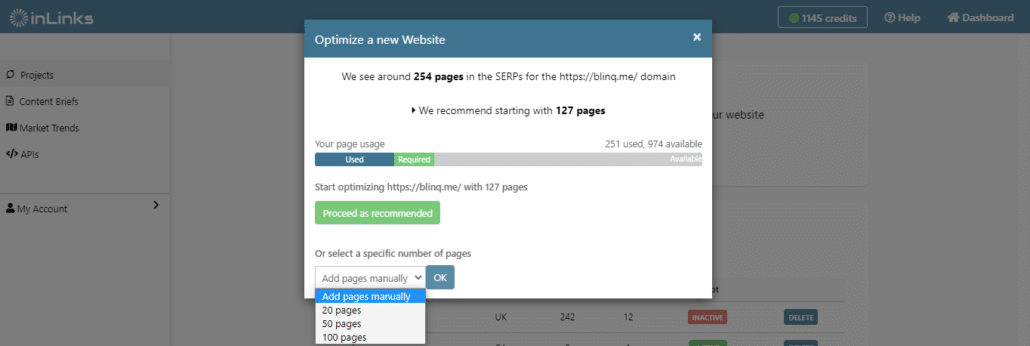
Now, bring in the blog posts you want to build internal links on. If using the free plan, you can only add 20 pages. On a paid plan, InLinks will show the total number of pages found in the search engine results page for your website. Then, based on your account type, the system will recommend a number of pages to start with. You can follow this recommendation or add select pages manually.
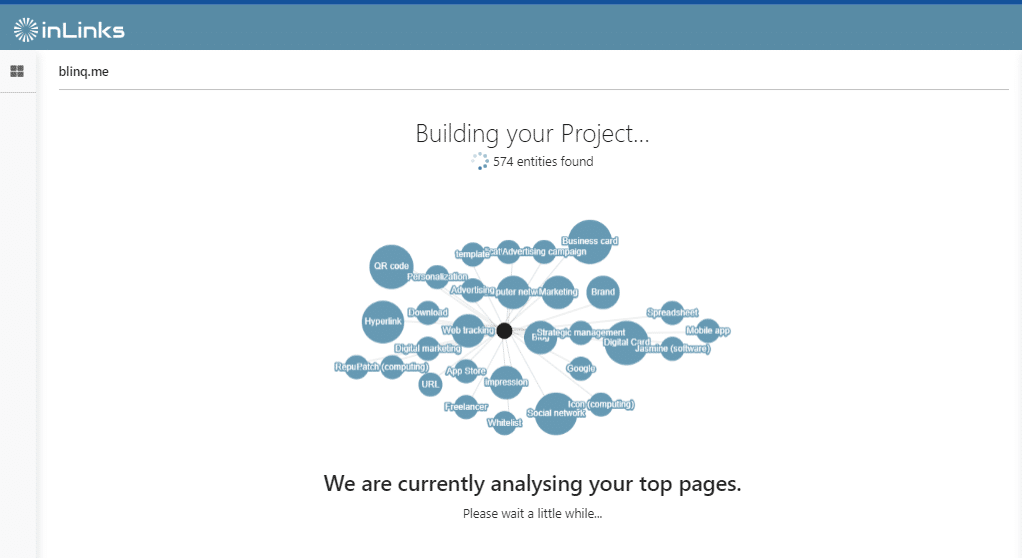
Hit proceed once you’re done, and the InLinks Natural Language Processing Algorithm (NLP) will start analysing your pages to extract the named entities within them. By understanding these entities, the software will identify internal linking opportunities within your content.
STEP 2: Start associating your main topics with their corresponding target pages
Once the NLP algorithm completes its analysis, it’ll open your project dashboard. If you navigate to “Website Pages” from the sidebar menu, you’ll see all the pages you just brought in and some ranking data.
Switch to topics, and you’ll see a knowledge graph with all the named entities InLinks extracted from your pages. At the top row, you’ll find data like:
- cannibalization
- frequency of each topic
- Number of links created
- internal links opportunities the system has identified
- and search engine understanding score of your topics.
You’ll notice a filter function at the top too. It contains the different categories of entities the InLinks NLP has found on your website. Use it to narrow the topics according to the category most important for your website.

Now, it’s time to start associating your main topics with their corresponding target pages. You can do this from the page and topic level.
At the page level, pick a page, then click on “Target” to see a list of entities found on that page, including the number of potential links that could be created. Once you find the right entity, click select, and the topic will be associated with that page. After that, you’ll be unable to associate that topic with a different page. We recommend that you associate the most important topic you would like the particular page to rank for.
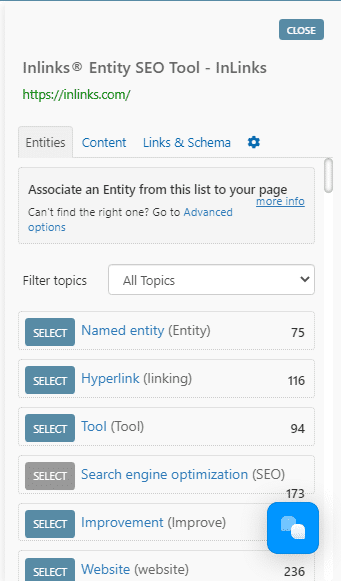
Again, you can filter by topics. If you prefer to review the content, click on the content tab. On the rare occasion that you can’t find a suitable topic from the list, click on advanced options, then enter a Wikipedia URL of the entity you’d like to associate with your page so InLinks can bring it in.
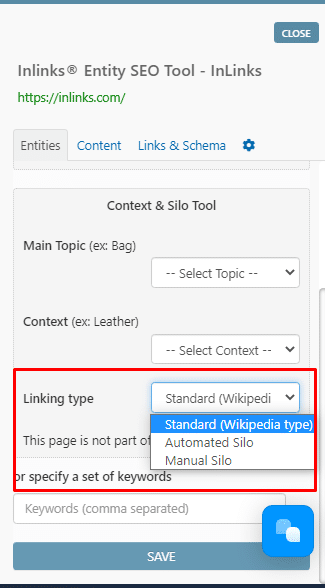
Still in advanced options, you can set the context for how InLinks should build internal links to a target page. Choose between standard (Wikipedia) linking type, automated or manual silo. Then click save.
Once you associate your important pages with their topics, InLinks will immediately find and build internal links to them from other relevant pages.
At the topic level, look through the knowledge graph to associate your important topics with their target pages. The process is similar to the page level. Once you click target, you’ll see a window showing the number of times a topic is mentioned in a project and the potential target pages.
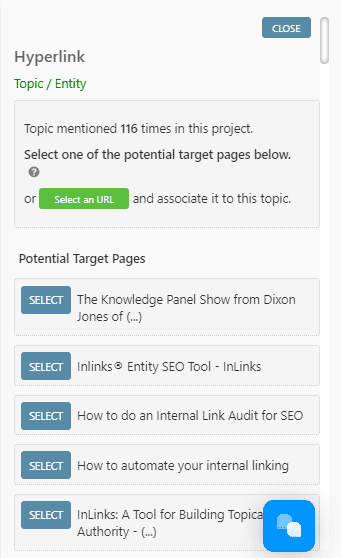
Again, associate the most important page you want to rank for a particular topic. Once you do, InLinks will then build internal links for that topic.
STEP 3: Review your internal links
Once you complete the topic associations, look at your dashboard at the topics level to see the total number of internal links InLinks has built for each topic. You can refresh the page if you do not see it immediately.
Click “internal link” from the sidebar menu to review your internal links. You can view by source page or target page.
When you click on an internal link, you’ll see the page it’s coming from or pointing to and the topic being discussed on such a page. You can edit or remove the link if you think it’s irrelevant. You’ll also notice that the anchor text varies between exact match words to synonyms, sentence fragments, and phrases. InLinks always diversify the anchor text, considering the surrounding content and the topics discussed on the linked pages. We want to give Google and users all the context they need to understand your content.
It’s important to note that InLinks recognises all the hard-coded links on your pages to avoid duplication. Also, remember that InLinks will only build internal links between pages you’ve added to a project.
STEP 4: Automatically add internal links to your website
After reviewing the internal links, publish them live on your website by adding the InLinks JS code to your site and activating it.
Just click the red button at the top right, copy the link, place it in the footer of every page you want to build links on, and the links will go live immediately.

FAQ on InLinks internal linking tool
What kind of website does the InLinks JS code work on?
The InLinks JS code is a static JavaScript file that works well on any CMS.
How much does internal linking with InLinks cost?
You can start building internal links immediately after you sign up. We offer a $1 trial for the first month. After that, you’ll need to buy a paid plan to build links to more pages. The paid plans start at $49/month. Please view our pricing page for more information.
Does InLinks support all languages?
Currently, InLinks supports eight languages: French, English, Spanish, German, Dutch, Italian, Polish, and Portuguese. And hopefully, more to come in the future.
Use InLinks internal linking tool to save time and optimize your website for ranking
The benefits of using InLinks for internal linking are numerous. First, it saves you time, and time is money. Managing internal links manually is time-consuming, mentally tasking, and prone to error.
However, InLinks solves this problem seamlessly by identifying linking opportunities and building links automatically without you having to intervene.
Additionally, the tool helps you create an optimized internal links structure and maintain it as your content library grows. Whether you manage your own site or a client’s InLinks is an essential part of every SEO’s toolbox. And in addition to internal links, InLinks automatically generates SEO schema and aids your keyword research, content planning, and content optimization.
| This post was researched and drafted by Juliet John and reviewed and edited by Dixon Jones. |
Related reading:
Leave a Reply
Want to join the discussion?Feel free to contribute!