

Internal links are a critical part of WordPress SEO. As one of the leading Content Management Systems, WordPress presents a smooth interface for webmasters to add and manage internal links. However, building internal links manually is hectic, time-consuming and prone to mistakes. Hence, using an internal linking tool (read plugin) is important.
Enter InLinks.
InLinks makes it incredibly easy for you to build and manage internal links on your WordPress website. Although not a plugin, the tool works well with WordPress to automatically find internal linking opportunities in content, build links between those pages and keep your website organized.
This brings us to the question –
How does InLinks build internal links on WordPress without a plugin?
The best internal links plugin for WordPress—InLinks—is not really even a plugin! InLinks uses one line of Javascript code to automate internal linking on WordPress websites. Once you signup and create a project, you’ll be given a line of code specific to that particular project. We recommend that you add this code to your website’s footer to enable InLinks run on any page that loads on your site. The code looks something like this:
| <script defer src=”https://JScloud.net/x/31044/InLinks.JS”></script> |
With this code installed and properly validated on your site, the InLinks system will build a complex and accurate internal linking structure within your website once you assign each content page to a target entity. After building the links, the code will automatically push them live onto your website. But it doesn’t end there.
When you add more content pages to your site and bring them into an InLinks project, the code will identify internal linking opportunities in those pages and build links. Similarly, whenever you modify any page that’s part of your project on InLinks, the JS code will reanalyze the internal links on that page to ensure they’re optimized.
| 💡→ Note: You always have to add new pages to an existing InLinks project for the system to build links. |
This saves time and removes the stress of performing a site-wide search on Google and reading through each page to find internal linking opportunities whenever you create new content.
With our code running in the background, you can rest assured that your WordPress website will remain optimized for users and crawlers and rank better on the search engine results pages.
Where to find the InLinks JS code
You’ll find the JS code inside every project you create on InLinks. To use the code, you simply have to copy and add it to your WordPress site. Here’s a visual guide to follow.
STEP 1:
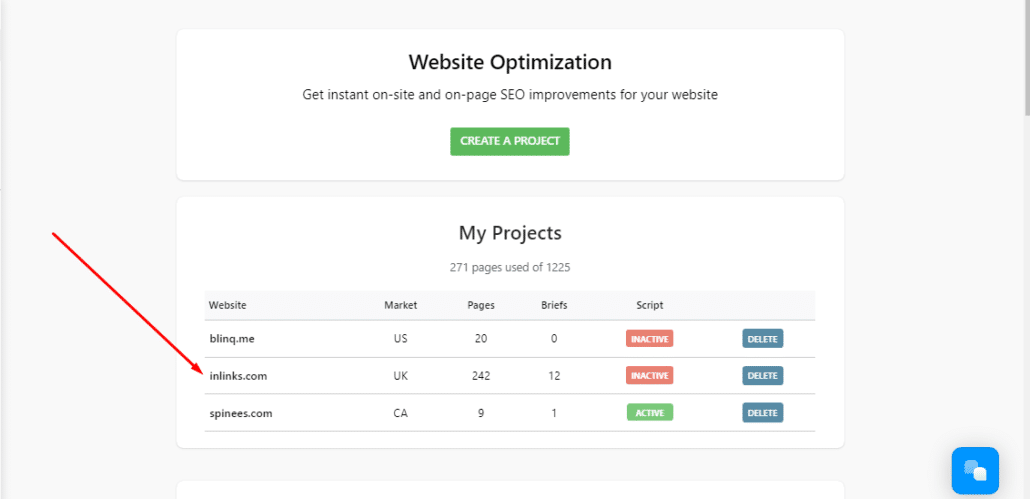
Log in to InLinks and click on the project you’ve set up from your dashboard.
STEP 2:
When the project page opens, look at the top right of your screen and click the red JS code is inactive button to view your code.
Then, copy it.
How to add the InLinks JS code to WordPress
Once you’ve copied the JS code from your InLinks project, they’re several ways to add it to your WordPress website.
For instance, if you’re a developer, you can manually add the code to your website’s footer by editing your WordPress theme files. If you’re not (which may be the case), simply use a plugin like WPCode from the WP repository to install the code. Here are the steps to follow.
STEP 1:
Log in to your blog via /wp-admin
STEP 2
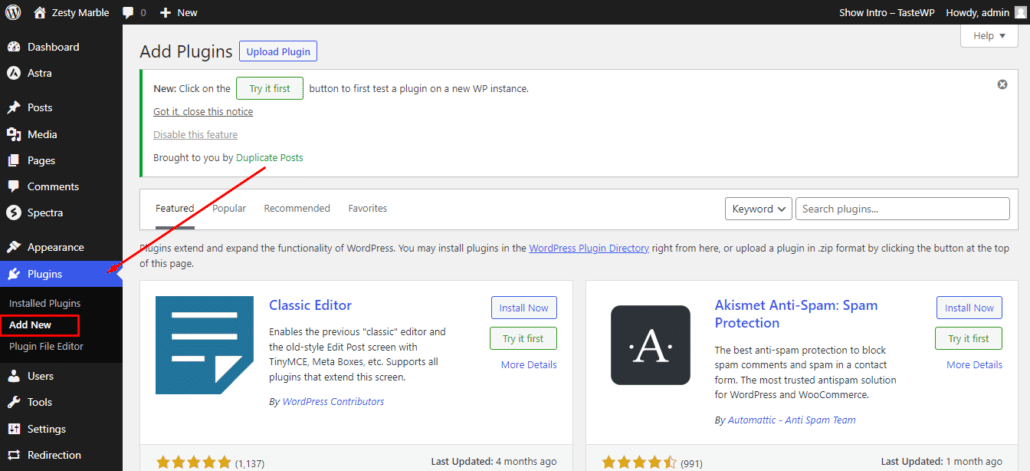
Scroll down to Plugins in the dashboard menu and click on Add New.
STEP 3:
In the search bar, search for WPCode. Click Install Now, then Activate.
STEP 4:
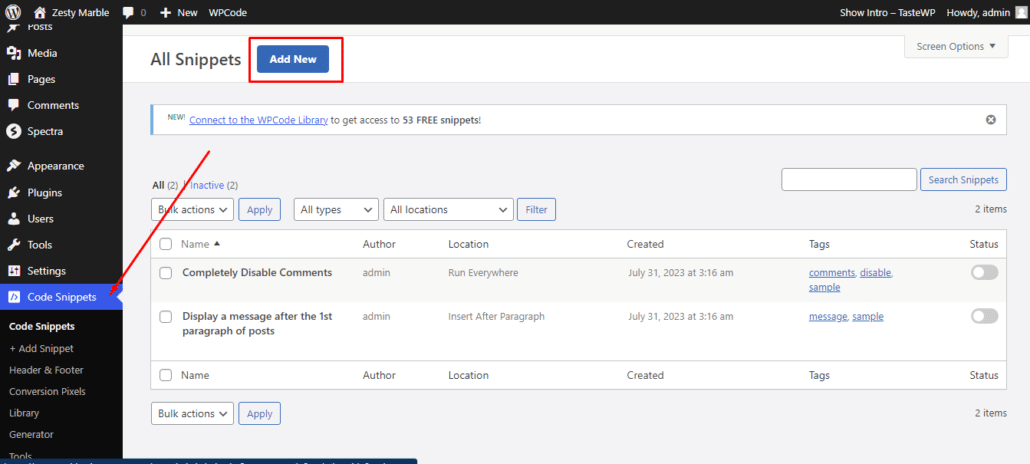
Once you’ve installed the plugin, go to the WordPress dashboard. On the menu, click on Code Snippets, then, Add New.
STEP 5:
Hover on Add Your Custom Code and click Use Snippet.
On the next screen, name your code, then paste the InLinks JS code you copied from your project dashboard into the code editor.
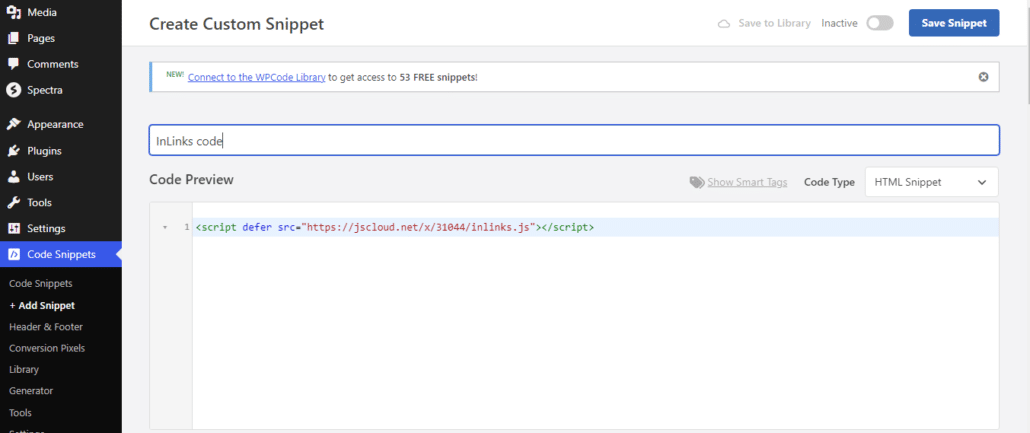
Next, scroll down the page to set the location you want the code placed. Click the drop-down and select Site Wide Footer.
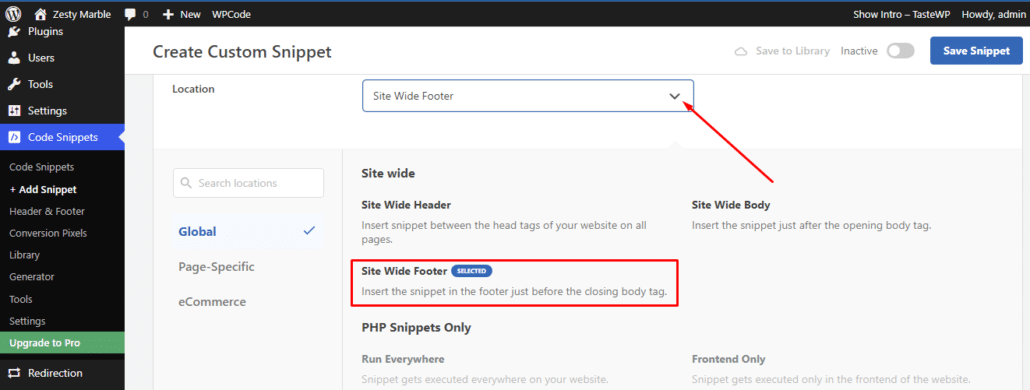
STEP 6:
With your code in place, toggle the Inactive button at the top right, then click Save Snippet to add the code to your website.

Check if your code has been properly implemented
Once you’ve added the code, you should be able to verify the installation immediately. Just go back to your InLinks project dashboard and click the JS Code Is Live On Site button, which should now be green.
On the pop-up, click Check Code Implementation.

If the code is properly installed, it’ll show “All Good”.
Why use InLinks for internal linking on WordPress?
You should choose InLinks over other WordPress internal linking plugins for several reasons.
The first reason is that InLinks ensures your website maintains a proper internal linking structure so users and web crawlers can navigate and understand your content.
But most importantly, you should use Inlinks on your WordPress website because InLinks understands context.
Most other internal linking plugins focus on matching keywords to content pages in order to build links between them. This method often leads to spammy, irrelevant links and content cannibalization, which can-
- confuse search engine crawlers,
- frustrate visitors,
- reduce your rankings.
InLinks, on the other hand, uses a different, better approach. Since it’s an entity SEO tool, it first crawls your content pages to understand their underlying meaning. This happens after you add your pages to a project.
Then, as you associate each content page to a target entity, the system uses its understanding of your content to spot internal linking opportunities and connect contextually relevant pages using varied link anchors. By varied anchor text, we mean semantic phrases, synonyms, sentence fragments, and sometimes exact keywords. This means your internal links look more natural, are valuable to your readers and appropriate for each page.
Additionally, InLinks will only place links within a body of text, not randomly on your page. So, there’s zero chance of an irrelevant link interrupting the flow of your content.
Another important reason is this – the InLinks JS code has extremely low latency, so it will not slow down your WordPress website. It’ll handle all your internal linking without any additional code and work well with every other SEO plugin you have installed.
And in addition to internal links, the JS code will automate schema markup for your WordPress site. So you don’t have to download a separate plugin for schema generation.
Make InLinks a part of your WordPress SEO
From internal linking to schema markup, content planning and generation, InLinks will help increase traffic to your WordPress website. Our award-winning entity SEO tools are designed to help WordPress users like you ship and manage blogs that rank highly in your business niche.
If you find setting up InLinks more complicated than we’ve described, fear not! We provide close to 24/7 human support via the blue chat icon on the bottom right of this page. Click it to speak to one of us. In addition to that, we’ve compiled a plethora of Youtube tutorials and FAQs on all our features. We even offer free demos to show you how InLinks works. So, do not hesitate to reach out!
| This post was researched and drafted by Juliet John and reviewed and edited by Dixon Jones. |
Related reading:
Internal linking strategies to boost your SEO
